

I love these little guys and think I should spread the love. They are quite easy and are soooo soft and cuddly when they are done its ridiculously difficult to give them away.
You will need:
- one stray sock (OK! so, technically, this isn't a stray since I bought a whole lot on ebay just for this purpose, but go with me here)
- some fleece for the foot pads and the underside of the ears (a really small bit will do, no larger than an A5 sheet is needed, and it can also be cotton or another sock or and old t-shirt etc)
- two buttons for the eyes and a third larger one for the nose
- a bit of brown felt for the eye surrounds (this is optional and can also be any other type of material you can scavenge, you could probably paint both these and the eyes on if you're worried your sewing may be dislodged by a baby etc.)
- some stuffing (I used fibre fill but really any old scraps are fine, try an old lumpy pillow for example)
- a pair of scissors
- some thread in a co-coordinating colour.

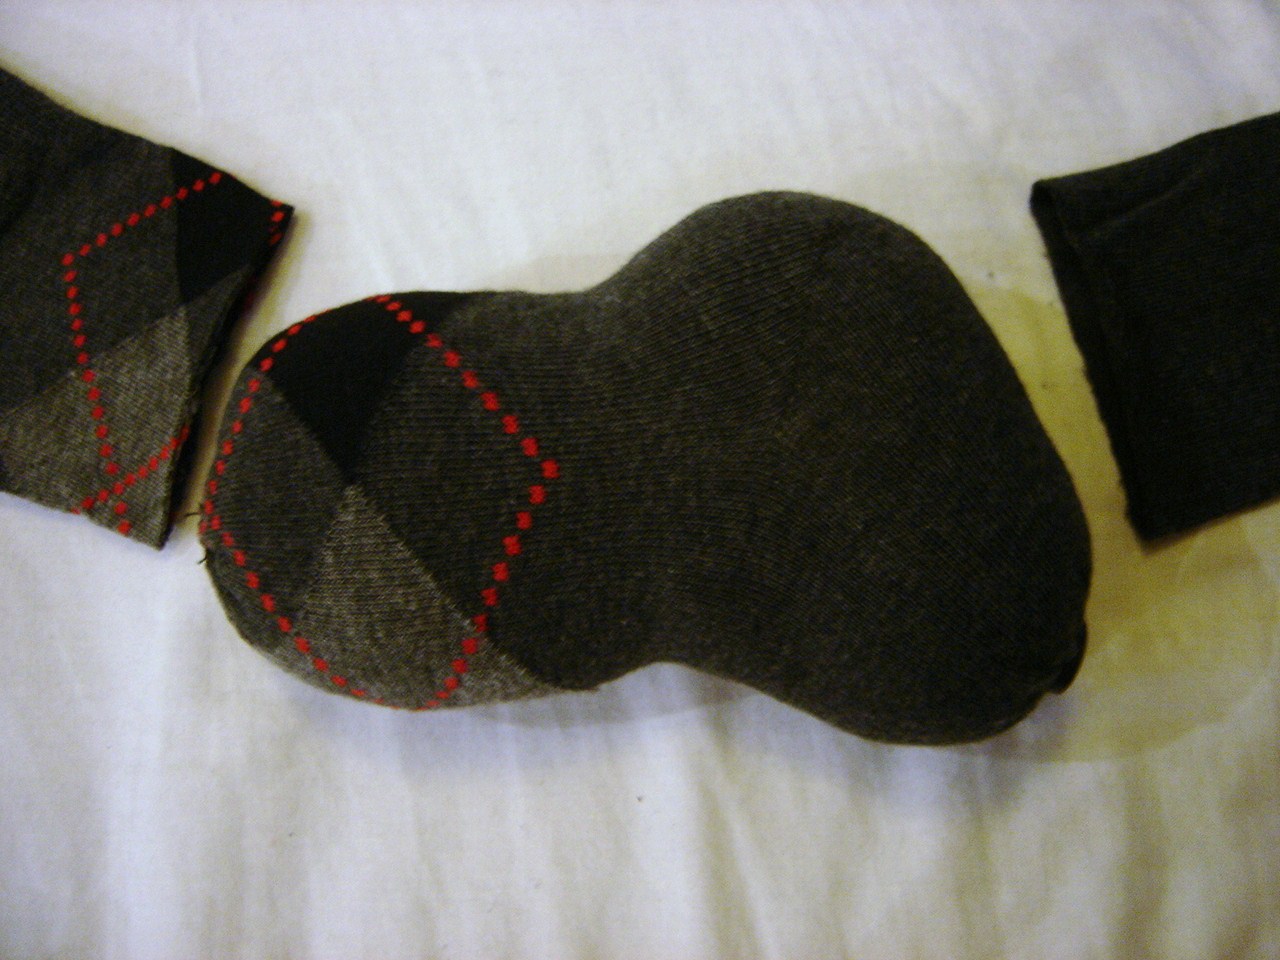
Then cut the sock like so:

The portion to the left is the legs, the middle is the body and head and the right is the tail and ears.
Take the middle section, turn inside out, and gather and sew the right most side closed (the non-stripey side in this photo).

The easiest method for me is to run some medium stitches all the way around then pull to gather and sew some stitches across the opening to secure shut. Flip right way around and secure on the larger button for the nose.

Gather the bum end closed using the same method as above. Don't worry too much about hiding your rough edges as we'll sew his tail over this area later. Right! Thats the body done. Have a cup of tea and congratulate yourself on a job half done.
When you're ready, take the remaining bits from above and cut to look like this:

Next, cut like so

OK-slight shortage of photo's here but do this
- Placing wrong sides together, sew along the outside of the tail leaving the bottom open, turn right way. (Note, tail can be made out of fleece too if prefer). Sew the bottom edge of the tail around the gather of the bum of the puppy, hiding the gather edges.

- Cut 2 pieces of corresponding fleece for ears. Taking a piece of fleece and a piece of sock- turn right sides together and sew leaving only a small hole for turning right way. Turn right way out and slip stitch hole closed. Put aside
- Sew down the long sides of the back and front legs to make tubes. Cut circles out of your fleece that will cap the ends of these tubes and sew 1 onto each of the four legs. To sculpt back legs, fold "foot" up to "leg" section and stitch v closed. In the photo below the yellow lines are brought together and stiched together and the red line is the crease that is folded into the leg.

The photo below shows the effect you're going for with the back legs.
Take assorted body parts and stitch to body. Like so:


And that's it! Love your puppy and look forward to stray socks in the future!
(P.S. Don't feel like sewing? Click here to buy them in the Little Black Teapot Shop )
Featured on

Update:
Some lovely people sent me photo's of their versions of this project. View it at Single Sock Dog Update.
Happy crafting!

How adorable! Is it alright if we link your blog for our followers to see?
ReplyDeleteThat would be really great! Thanks so much!
ReplyDeleteHow adorable! I just cleaned out our sock drawer and found way too many strays. Some of them are just dying to be made into cute little puppies... The argyle pattern is the best!
ReplyDeleteBrilliant!! Thanks for sharing! Gonna have a cup of tea now too! :) Love from a South African living in the USA x
ReplyDeleteaw this is GREAT!!!!! i have to sew this dog as soon as possible <3
ReplyDeleteloves,
katja
I followed your tutorial! Here's my final product:
ReplyDeletehttp://pamandmatt.blogspot.com/2010/08/this-weekend-preview.html
I know the one on the left is a mouse...but hey! The other one looks like a dog!! Thanks for the fun project!
pam{dot}helm{at}hotmail{dot}com
Hi,
ReplyDeleteI like your blog, is beautifull!!
Visit my blog, jud-artes.
Congratulacions from Brazil.
Judite
So cute!!!A lovely idea to do with my children!.
ReplyDeleteTeehee awesome jillybob
ReplyDeleteI just made one from a light blue Fox Mills red heel sock, for my friend's Maltese, who has a sweater with a sock monkey face knit into it. This is too cute, and I know he will love it. I used cotton balls to stuff it, and embroidered its eyes and nose on. Thank you very much for the instructions and pictures to make such a clever little toy!
ReplyDeleteI love this! I featured you over at my blog ziggycrafts.blogspot.com thanks for sharing!
ReplyDeleteThanks for sharing your tutorial! The dog was so cute I had to make one :) Then I played about a bit with this pattern, took some ideas from your dino tutorial and I made a sock Dragon! http://emmalm.wordpress.com/2010/11/02/sock-dog-and-sock-dragon/
ReplyDeleteOh emma those are great! I'm loving the variation on the dino to make a dragon- the wings are excellent. thanks for showing me!
ReplyDeleteSo Cute. Thank you so much for sharing this!
ReplyDeleteoh so cute . . .
ReplyDeleteso adorable ...
ReplyDeletethanks a lot
Hi I'm a new follower and I just love soft toys for kids. I linked your tute to my blog. Can't wait to see more.
ReplyDeleteOMG! this is sooooo cute I'm 12 and i made one out of my blue socks with colorful polka dots! thanks for that fun idea, i love my new puppy :D
ReplyDelete<3~ Fallon
I found this little fella via Pinterest - I'm going to have to make him for my nephew, he's so cute (dog and the nephew)
ReplyDeletehello I have a blog where I index interesting tutorials.
ReplyDeletejust two links and a very small photo.
I would like to index this tutorial with your permission. My blog:
http://tutolibre.over-blog.com/
Sorry for my english ... oups !
No problem! thanks for the links :)
ReplyDeleteHello!
ReplyDeleteThis little dog is adorable! Would it be possible to sell the creations made from this pattern? Could it be arranged?
Thanks
Hi! I'm sure we can arrange something awesome for both of us. Send me an email to gekkogirl@btinternet.com
DeleteHello!!! I'm trying to make the doggie with my daughter and the sewing of the legs is unclear to me, do you sew the pieces longitudinally or the other way? COuld you be more specific with the steps??? We really love your creations and fell in love with the dog instantly!!!
DeleteThanks,
pamplonica
Hi! no problem- the legs are a rectangle and you need to sew the long sides of the rectangles together to make the longest tube possible with the piece of sock. Hope that helps, and send me a photo of your finished creation so we can add it to the others :)
DeleteHi, thought I would drop you a line to say i think this tutorial is amazing and I hope you don't mind that I have created a post on my blog about your animals. Feel free to pop over and have a look....
ReplyDeletehttp://prettyshabbyuk.blogspot.co.uk/2012/05/collection-of-stuffed-animal-tutorials.html
Please help! How do you do the capping on the legs? Oh I'm so confused
ReplyDeleteHi, don't worry- I explain it in more detail here in my elephant tutorial http://littleblackteapot.blogspot.co.uk/2010/11/baby-elephant-tutorial.html.
DeleteLook at how you sew a straight piece of fabric to a circle (like the elephant's body and feet) and then sew the straight piece closed to make a closed tube. Hope this helps.
If not, you can also just sew a tube for the leg and then, using the same method as the dog's nose, sew big stitches around one of the open sides, pull the threads to mkae it gather closed and turn right way around.
Saw this on pinterest and it's adorable! I love sock animals!
ReplyDeleteim making it now for my bff's b-day i might play around abit....
ReplyDeleteSo cute! And what a great way to re-purpose something as simple as a sock who has lost its mate! I am making shoeboxes for Samaritan Purse's Operation Christmas Child, and I am going to try making some of these to include in the boxes. Thanks for the great idea and tutorial!
ReplyDeleteThanks for the challenging project! I made my first doggie this week and here it is: https://scontent-a-ord.xx.fbcdn.net/hphotos-prn2/1475893_10151841268971295_1678360679_n.jpg
ReplyDeleteHad fun with a few pattern alterations (ears & paw definition) and accessories, too...collars :-) Only sad part is that he/she will be leaving us...traveling soon to New Zealand to be a Christmas present for our pastor's newborn grand daughter ;-) I look forward to making some more pups & some other sock animals, too.