Showing posts with label bias binding. Show all posts

Sunday, 14 April 2013

Chevron Quilt Tutorial


I have been eyeing chevron (zigzag) quilts for a while now and the immanent arrival of my sisters baby gave me a great excuse to try this kind of quilt. I could also use plenty of the fabric left over from my Polaroid Quilt.
I looked for tutorials online but struggled a bit to understand them, so I thought I would add a quick bit of help for anyone who would like to make a similar zigzag quilt.

Chevron Quilt Tutorial:

To start I chose 2 contrasting fabrics, a white and a blue stripe cotton. Cut them into squares. 
Lay the fabrics on top of each other with the right sides facing each other. Then draw a pencil line from corner to corner. Trust me, you want to draw this line- I have tried eyeballing it, it it is waaaay too hard. 

Now, sew two straight seams on either side of the pencil line. I used the edge of my presser foot to guide me to keep the stitches parallel with the pencil line. I have done it in red thread to make it easier for you to see:

Cut down the pencil line to create two triangles:

Open out the triangles to form squares again. I ironed them open and I trimmed the corners to make them square. I don't think this is strictly necessary but it helped me to then start treating them as one piece.

And this is where it gets interesting. In the next two photo's I've shown you how these two triangles add together to form the pattern.

Lol! So, I only made 1 set of triangles but I used a bit of Gimp photo magic to show you how this all fits together to make the quilt:

And on to the quilt shots: (What a kind husband/clothes line!)


It was pretty overcast (yay UK!), so the colours are a bit odd but here is a close up of the quilt itself.

I used a lazy binding which is simply awesome. I folded over the backing towards the front quilt piece. (It's like wrapping a present but you fold it over from the back, making nice corners with an iron). I then top stitched the whole lot down. It saved me from the inevitable heartache of fighting with binding and is MUCH neater than I have ever achieved.

I used a deep red spotty fabric for the reverse and added my own label so the baby will know its from me in years to come.

I really like the spotty fabric as a backing because it shows off the quilting I did in the ditch of the seams: 

Thanks husband! No need to look so scary ;)
Leave a comment if you have any questions on how to make this type of quilt. It comes together far faster than expected and it feels awesome to see it take shape.

Happy Quilting!

Thursday, 6 October 2011

Two on the way!

It's so lovely when good friends announce they're expecting not just one little bundle but twins! The parents don't want to know the sex of these happy additions so for now we all know them as Topsy and Turvey. We're driving for 3 hours to see the couple before the arrival of these piglets and I simply had to take something in anticipation.
Firstly, the husband is a member of the Labour party like mine, and the two boys like nothing more than discussing the state of the world over a couple of beers. As a tribute to his leanings I had these printed by a lovely seller I found on Ebay.
Hammer and Sickle baby onesies! Awesome not so? And the quality of the onesies is simply great- nice, thick cotton. For the second set I shamelessly stole an idea from a Pinterest post and appliqued "copy" and "paste" on two more onesies.
I shan't show you my appalling aplique skills, it looks pretty decent from this distance but these are unfortunatley not such nice quality (oh, ebay, you hit-and-miss mistress!) so the stitches look a bit pulled because of the low thread count. sigh. It's the idea behind the gift right?

On a completely different note, I made my first apron for a friends birthday.

Just a simple pattern but without any fussy gathering. I already had the grey binding left over from my quilt, Score!
The sweet fabric is called Cartooon Dogs from the Boys Will Be Boys range designed by David Walker for Free Spirit.
I added a little button flower detail.
I have a tiny bit of this fabric left over but now I heart it so much that I can't bring myself to use it! I think I'm destined to have a hoard of material that I love too much to use! Am I the only one with this shameful secret?

Tuesday, 1 March 2011

Quick and Simple Snack Bag Tutorial

So here is a project that is supposed to be super quick and easy to satisfy a need. What need? Well! I like to buy the larger packs of snack etc because it's cheaper than lots of single helpings. However, these packs are not very easy to handle- trying to reseal a large pack of biscuits with an elastic band in a moving car on a road trip is not fun! The second need is very simple. If you give me a new packet of biscuits in a car I won't stop and will eat them all! This way I can portion out only a few and car trips can cease being a weight-gain fest...

These bags are easy to squeeze into the small spaces left when we've crammed the car for holiday and are wipe clean (but can be turned inside out and really washed if required). They also satisfy me eco-conscience because I'm not constantly buying plastic bags and containers.
I  made some of these for an expectant mum and they went down really well! She has plans to use them for damp flannels to wipe dirty faces, sterilized pacifiers etc.


To begin:
We will need 
  • Fabric- 1 window piece 20cm (8inches) by 24cm (9 and a half inches) and 1 back piece 20cm (8inches) by 20cm (8inches).
  • Clear plastic 2 pieces to the same dimensions as the fabric. (A note: I had the plastic left over from a clear plastic table cloth protector but you can buy this type of plastic in smaller amounts too. If you're willing to sacrifice the display window you can even fuse some plastic bags together to create the lining)
  • Hook and loop tape (velcro) about 8cm (3inches)
  • Bias binding (this can be avoided if you serge/overlock the edges instead)
  • Scissors
  • Thread
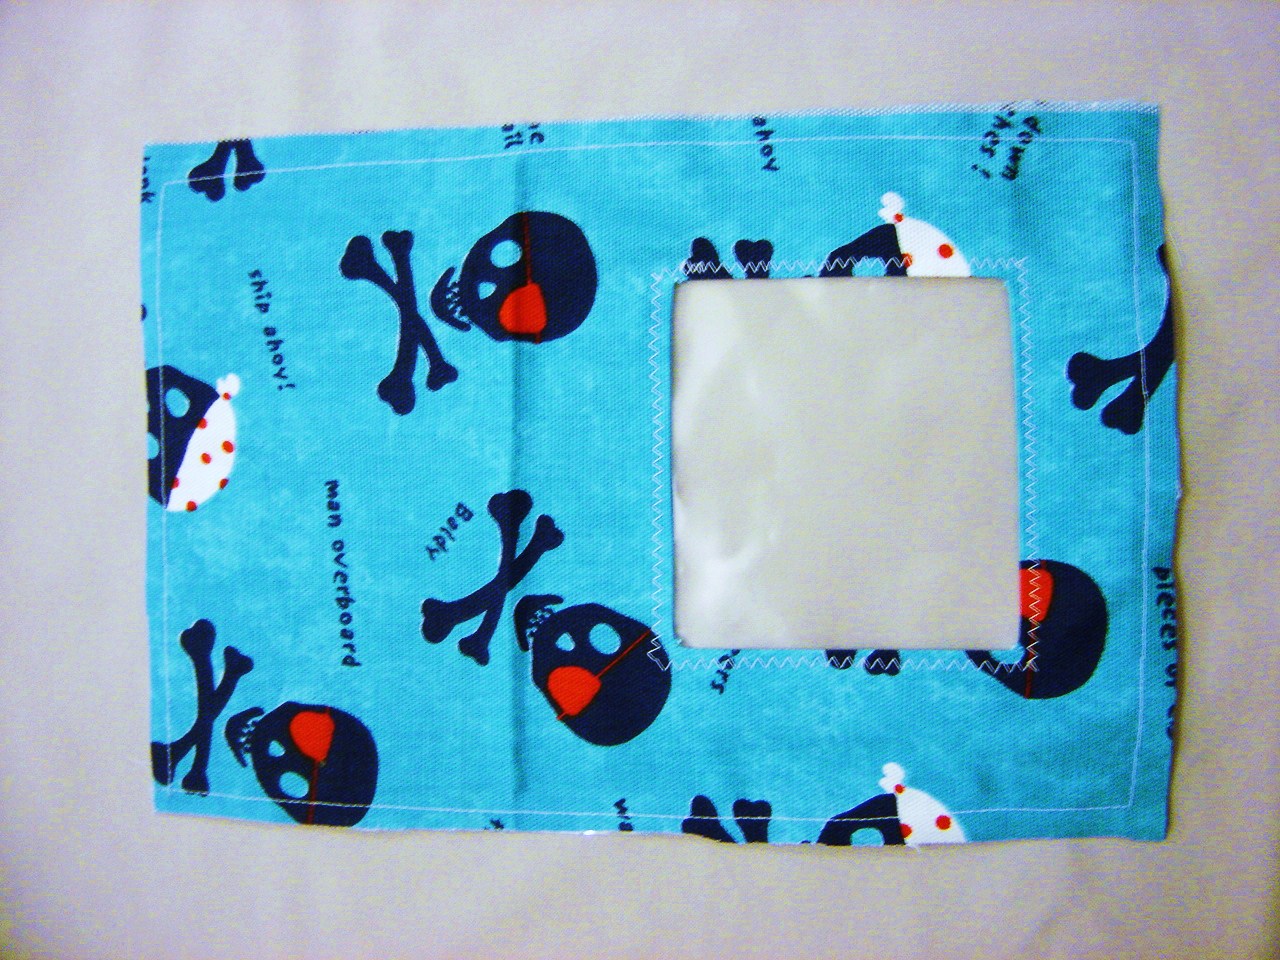
 First, let's cut the window. Take the larger piece and cut a hole in the bottom half of about 8x8cm (3x3inches). Try and centre the window with and equal amount of space on the sides and the bottom. NOTE: Do not do like I did and get so excited about cutting the window that I cut it so the pattern is facing the wrong way! Doh! now my skull pirates are upside down :(
Next cut a 1.5cm (half inch) diagonal at the corners of your window like in the photo below:
 At this point you could iron the folds inwards - but this project is DO EASY. So it's not necessary if you don't want to crack out the iron and speed and instantaneous gratification are more your thing!
Here's is a close up of the corners for clarity:
 Next, sew the smaller back fabric piece to it's corresponding plastic backing with the right side of the fabric facing away from the plastic. It can be helpful to sew with the fabric side on your feed dogs (the little feet that move the fabric forward under your presser foot.) The plastic can get stuck on these whereas I found the plastic slid happily under my presser foot.
 Again- this project is about speed and ease. Don't worry if it's not too straight (see below), I include a chop off your mistakes step!
 Now, on one of the short 20cm (8inch) sides fold the fabric-plastic sandwich over twice to make a finished edge. Like this:
 On the same edge, sew one of the pieces of velcro:

That's the small back piece done! tea time!

OK. Now take the larger front fabric piece and sew to it's plastic counterpart with the right side of the fabric facing away from the plastic. Once this is done it is easy to fold back the window flaps under the fabric outer and sew down (I used a zigzag stitch).
 Close up:
 The inside now looks like this:
 Take the small back piece and the front piece and sew together with wrong (plastic) sides facing. See the yellow stitching below. Remember the top of the back piece will take extra strain at the seams so sew further than the edge.
 Your bag should now look something like this:
Trim off the pesky not-lining-up bits! This also makes adding the binding easier since it removes the bulk inside the binding's fold.
Sew around the whole outside with the binding. There are many tutorials online for sewing on the binding (from the easy fold in half, set machine to massive zigzag and go for it! to the sew one side then the other. Do whichever suits you)
 At this point sew on the other bit of velcro to the plastic side, on the flap of the front piece.

 That's it! Admire your work

 Fill with treats (optional: munch treats immediately after sewing bag!)
 Make more!
Leave a comment below and tell me how you used your bag or point me to photo's of yours!

Tuesday, 27 July 2010

Every Boy is a Super Hero


Whipped this up (love using this phrase- makes it seem so effortless and amazing instead of the heartache sweat and tears that actually accompany a creative endeavor!) for my Godson. He seems to be really into super heroes and space this week. And since his last birthday kinda snuck up on us and we shamefully gave him money in a card this year I am totally justified in making another present, albeit months late.

Whilst this doesn't justify a full tutorial they are so simple that with a few pointers you can be on your way!
First I started with some very cheap and simple cotton as the base, cut the shape on the fold to get it symmetrical and hemmed all around ( I actually toyed with the idea of lining it and then remembered it was for a rough and tumble boy.) Next I added the ties which were simply long strips folded like bias binding then top stitched.


I fused interfacing to the letters since I didn't feel like using a close satin stitch would be appropriate (read: it takes too long and I'm lazy). This way the logo bits won't fray and the stitching is for placement only.
Here is a closer look at that stiching from behind:

Notice how my machine had a small hiccup with the bobbin thread that resulted in some super odd zigzag. I'm sure he won't care (well, I'm hoping he won't).


I then made him a mask which was just a single layer of cotton, trimmed in red bias binging with a bit of elastic sewn to the sides. I had to use some red embroidery thread around the eyes to stop the fraying becoming too ridiculous and I suspect that I should have used felt for the entire mask instead. This would mean absolutely no seams to worry about. But it wouldn't have matched perfectly. Sigh. maybe next time I'll come up with a genius plan.
Anyway, for all my self doubt, his mum told me that he loves it and wore it to the cinema today so I count this as a success!

Sunday, 20 June 2010

Even goths need pot holders

How true. Its is a sad goth that bedecks their house in shades of black but has to settle for pot holders with puppies and fruit. To this end I purchased some ludicrously expensive day of the dead fabric and made some potholders. Not the most challenging of projects (although that bias binding is a fiend) but quite satisfying.


Make me famous!