Single Sock Puppy is a favourite of the peeps who visit here and so I thought I'd add two photo's that people have been kind enough to send me of their versions of the puppy.
First from Emma over at http://emmalm.wordpress.com:
She made a standard one and then a dragon from the same idea. Love it!
These three were made by http://www.cutoutandkeep.net user Kantia and her daughter and a friend.
She was kind enough to repeat my tutorial for a single sock puppy on the website and show other users her results
Pam over at http://pamandmatt.blogspot.com kindly pointed me to hers in my comments. One is a mouse but I think he is super cute!
Thank you to everyone who visits and posts comments! It really helps to know that people are positive about my/our work and that I'm part of such a bright and vibrant community :)
Showing posts with label sock. Show all posts
Thursday, 5 May 2011
Tuesday, 7 September 2010
Single Sock Dino Tutorial
Thank you to all the people who requested this tutorial, your encouragement made it happen!
So here is my favourite soft hearted beast for your sewing pleasure.
To begin we need to gather supplies:
In this pattern the heel of the sock becomes his nose/face/muzzle (what is appropriate for a T-Rex?)
The part towards the toe of the sock is going to be the top of his head and the part towards the ankle is his body. The body part is about twice as long as the head part but don't be too worried about measurements etc.
Next we're gonna sew up the sock at the body hole.
To do this I turn the tube with the heel of the sock inside out and then run a longish stitch very simply around the lip of the tube, then gather closed. Once I've gathered I stitch across the opening a few times to seal it securely. Again, this is the part he will sit on so it doesn't have to be perfect.
Turn the sock right way round again and stuff with filling. You want to create the rough shape of the filling in your hands before you stuff it into the sock. This makes less lumpy bits. If you do need to add more filling, try making a space in the middle of the already existing filling and inserting the new in there. Um, like a pie filling :).
Now he's starting to look like something. There are two methods for the next bit.
The hole on the top of his head needs to be closed. You can 1) gather the hole closed like we did the other side or 2) do the slightly more elaborate, but I think neater, finish below.
If you do decide to just gather remember to pull the hole closed slowly and tuck the unfinished ends into the gather as you go (else he'll have a weird lumpy, sticky up bit)
This is the method I use:
Hold the toy facing away from you (to the left of the picture above). Pinch the hole closed so it runs in a line from the nose direction to along his spine. In the middle of this long opening make a stitch or two to hold in shape.
Now stitch about a thumbs width away from this holding stitch like in the picture above, then tuck the remaining edges of the hole back towards were the needle is. (In the picture above his nose is facing left and his bum is facing right) Stitch along these two new joins to close this end of the hole.
Repeat on the other side. There's no photo of this but to create his chin you need to sew a running stitch along his front, just underneath the heel of the sock, and from about ear to ear (If he had any!). (Kinda eye where you'd like the fold of his chin to be). Pull on this running stitch to gather it. The photo below shows how the sock dents under his chin but is smooth up his spine to the top of his head
You can also see in this picture how the hole that was at the top of the sock is towards his crown.
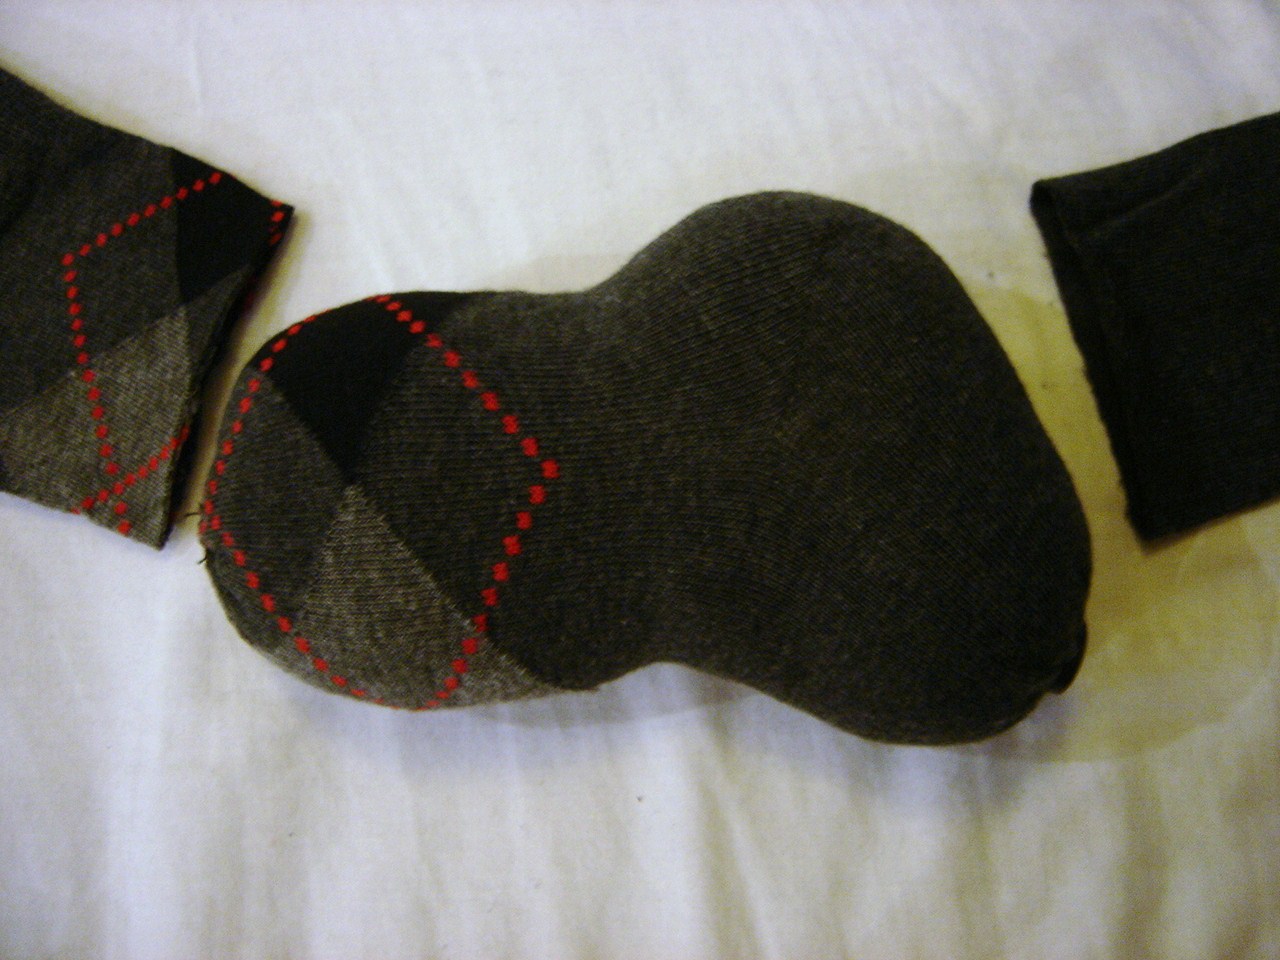
Next we need to cut the remaining sock bits to make his arms (sorry, claws) and his tail. The small bits to the left are cut from the leftover sock towards the shin and are folded double. ( the larger bit on top of the left group is just to show the ribbed elastic top of the sock and is not used). The group to the right is the original toe of the sock. I have cut from about the middle of the opening and gently curved the cut to make a pointy tail. The piece on the very right hand side will not be used.
Turn the tail and the arm pieces inside out and stitch into tubes with one closed end. Turn right way around and stuff gently.
Attach the arms and the tail to the body, tucking in the unfinished ends as you go.
Next we cut the felt for the scales. A word on cutting the scales- if you're gonna make more than one of these begin by cutting a rectangle of fleece and cutting the diagonals down the centre of this rectangle, never quite touching the outside edge of the rectangle. That way you get two scale pieces instead of one and a whole lot of useless triangles.
Sew the scales to the dinosaur. You can see how I sew on the scales in this photo.
He should look something like this handsome boy at this stage.
Next we attach his eyes- I liked traditional beady eyes but bigger crazy ones would be cute too.
Finally his face! I just free hand embroider a big toothy grin and some french knot nostrils on mine. If you'd like a bit more symmetry (which mine are seriously lacking!) then use some dress makers chalk, or wash away fabric pen to sketch on a mouth. If you don't know how to make a french knot, the internest will teach you or just sew two little crosses or circles etc.
That's it! Congratulations you've just made the world a more dangerous and cuddly place!
(P.S. Don't feel like sewing? Click here to buy them in the Little Black Teapot Shop )
Featured on
So here is my favourite soft hearted beast for your sewing pleasure.
To begin we need to gather supplies:
- A pair of scissors
- A sock (This one is a bit thread bare and woolly and needs a new lease on life)
- Some red (or, really, any colour) felt
- 2 buttons for eyes
- Some coloured thread for sewing together and making his face
- Some filling ( I used standard fibre fill, but even scraps of fabric would do)
In this pattern the heel of the sock becomes his nose/face/muzzle (what is appropriate for a T-Rex?)
The part towards the toe of the sock is going to be the top of his head and the part towards the ankle is his body. The body part is about twice as long as the head part but don't be too worried about measurements etc.
Next we're gonna sew up the sock at the body hole.
To do this I turn the tube with the heel of the sock inside out and then run a longish stitch very simply around the lip of the tube, then gather closed. Once I've gathered I stitch across the opening a few times to seal it securely. Again, this is the part he will sit on so it doesn't have to be perfect.
Turn the sock right way round again and stuff with filling. You want to create the rough shape of the filling in your hands before you stuff it into the sock. This makes less lumpy bits. If you do need to add more filling, try making a space in the middle of the already existing filling and inserting the new in there. Um, like a pie filling :).
Now he's starting to look like something. There are two methods for the next bit.
The hole on the top of his head needs to be closed. You can 1) gather the hole closed like we did the other side or 2) do the slightly more elaborate, but I think neater, finish below.
If you do decide to just gather remember to pull the hole closed slowly and tuck the unfinished ends into the gather as you go (else he'll have a weird lumpy, sticky up bit)
This is the method I use:
Hold the toy facing away from you (to the left of the picture above). Pinch the hole closed so it runs in a line from the nose direction to along his spine. In the middle of this long opening make a stitch or two to hold in shape.
Now stitch about a thumbs width away from this holding stitch like in the picture above, then tuck the remaining edges of the hole back towards were the needle is. (In the picture above his nose is facing left and his bum is facing right) Stitch along these two new joins to close this end of the hole.
Repeat on the other side. There's no photo of this but to create his chin you need to sew a running stitch along his front, just underneath the heel of the sock, and from about ear to ear (If he had any!). (Kinda eye where you'd like the fold of his chin to be). Pull on this running stitch to gather it. The photo below shows how the sock dents under his chin but is smooth up his spine to the top of his head
You can also see in this picture how the hole that was at the top of the sock is towards his crown.
Next we need to cut the remaining sock bits to make his arms (sorry, claws) and his tail. The small bits to the left are cut from the leftover sock towards the shin and are folded double. ( the larger bit on top of the left group is just to show the ribbed elastic top of the sock and is not used). The group to the right is the original toe of the sock. I have cut from about the middle of the opening and gently curved the cut to make a pointy tail. The piece on the very right hand side will not be used.
Turn the tail and the arm pieces inside out and stitch into tubes with one closed end. Turn right way around and stuff gently.
Attach the arms and the tail to the body, tucking in the unfinished ends as you go.
Next we cut the felt for the scales. A word on cutting the scales- if you're gonna make more than one of these begin by cutting a rectangle of fleece and cutting the diagonals down the centre of this rectangle, never quite touching the outside edge of the rectangle. That way you get two scale pieces instead of one and a whole lot of useless triangles.
Sew the scales to the dinosaur. You can see how I sew on the scales in this photo.
He should look something like this handsome boy at this stage.
Next we attach his eyes- I liked traditional beady eyes but bigger crazy ones would be cute too.
Finally his face! I just free hand embroider a big toothy grin and some french knot nostrils on mine. If you'd like a bit more symmetry (which mine are seriously lacking!) then use some dress makers chalk, or wash away fabric pen to sketch on a mouth. If you don't know how to make a french knot, the internest will teach you or just sew two little crosses or circles etc.
That's it! Congratulations you've just made the world a more dangerous and cuddly place!
(P.S. Don't feel like sewing? Click here to buy them in the Little Black Teapot Shop )
Featured on
Thursday, 2 September 2010
Single Sock Bunny
I have been so overwhelmed by all the sweet messages and encouragement since the tutorial for a Single Sock Dog was featured on One Pretty Thing. Thank you to everyone.
Because of all the requests I'm working on a tutorial for the Single Sock Dino, but before this I made this little fellow over the weekend.


I made a very soft yarn pompom for his tail (I think its called teddy bear yarn and its so ridiculously soft it may be sinful :) ) and used pink flowery corduroy for the underside of his feet and ears. Originally he had a mouth but I decided I preferred this better since I wanted the pearl button nose to be the focus.
The flower is courtesy of the last gasps of my garden before winter comes to our corner of England and I forget what sun, flowers (and bunnies!) look like!
Sunday, 22 August 2010
Single Sock Dino & Kitteh
After the joy of single sock pup I made these two: Single sock Dino and Single sock Lucky Cat.
I am particularly proud of the kitty's paws even though I may love the dinosaur more. Shhh! don't tell them. Whats really handy is that I've already whipped up two more of these for donation into a church sale and they only take a couple hours.
(P.S. Don't feel like sewing? Click here to buy them in the Little Black Teapot Shop )
Update: Tutorial for Dino added: Click here for Single Sock Dino Tutorial
The dialogue is brought to you by my dh. His superb contribution to my endeavours. (When we're not having "creative differences" about how big the kitty's tail should be...... :)
I am particularly proud of the kitty's paws even though I may love the dinosaur more. Shhh! don't tell them. Whats really handy is that I've already whipped up two more of these for donation into a church sale and they only take a couple hours.
(P.S. Don't feel like sewing? Click here to buy them in the Little Black Teapot Shop )
Update: Tutorial for Dino added: Click here for Single Sock Dino Tutorial
Tuesday, 27 July 2010
Single Sock Dog Tutorial
I love these little guys and think I should spread the love. They are quite easy and are soooo soft and cuddly when they are done its ridiculously difficult to give them away.
You will need:
- one stray sock (OK! so, technically, this isn't a stray since I bought a whole lot on ebay just for this purpose, but go with me here)
- some fleece for the foot pads and the underside of the ears (a really small bit will do, no larger than an A5 sheet is needed, and it can also be cotton or another sock or and old t-shirt etc)
- two buttons for the eyes and a third larger one for the nose
- a bit of brown felt for the eye surrounds (this is optional and can also be any other type of material you can scavenge, you could probably paint both these and the eyes on if you're worried your sewing may be dislodged by a baby etc.)
- some stuffing (I used fibre fill but really any old scraps are fine, try an old lumpy pillow for example)
- a pair of scissors
- some thread in a co-coordinating colour.
Then cut the sock like so:
The portion to the left is the legs, the middle is the body and head and the right is the tail and ears.
Take the middle section, turn inside out, and gather and sew the right most side closed (the non-stripey side in this photo).
The easiest method for me is to run some medium stitches all the way around then pull to gather and sew some stitches across the opening to secure shut. Flip right way around and secure on the larger button for the nose.
Notice how the heel of the original sock is going to be the forehead of our puppy. Stuff with filling. Because I'm using fibre fill and I don't want to make him too firm I softly sculpt the filling in my hands before I place it inside him. This way I can make three distinct balls, 1 for his nose, his forehead and his body. This is important a bit later when we create his neck.
Gather the bum end closed using the same method as above. Don't worry too much about hiding your rough edges as we'll sew his tail over this area later. Right! Thats the body done. Have a cup of tea and congratulate yourself on a job half done.
When you're ready, take the remaining bits from above and cut to look like this:
(Note, the remains are in the same order the first cuts we made above if you are uncertain). The sections marked back legs, front legs and tail are tubes and the section called ears is a pocket.
Next, cut like so
Each of the back legs and front legs is folded double. The tail is two pieces and the ears are single pieces to show the shapes.
OK-slight shortage of photo's here but do this
- Placing wrong sides together, sew along the outside of the tail leaving the bottom open, turn right way. (Note, tail can be made out of fleece too if prefer). Sew the bottom edge of the tail around the gather of the bum of the puppy, hiding the gather edges.
- Cut 2 pieces of corresponding fleece for ears. Taking a piece of fleece and a piece of sock- turn right sides together and sew leaving only a small hole for turning right way. Turn right way out and slip stitch hole closed. Put aside
- Sew down the long sides of the back and front legs to make tubes. Cut circles out of your fleece that will cap the ends of these tubes and sew 1 onto each of the four legs. To sculpt back legs, fold "foot" up to "leg" section and stitch v closed. In the photo below the yellow lines are brought together and stiched together and the red line is the crease that is folded into the leg.
The photo below shows the effect you're going for with the back legs.
Take assorted body parts and stitch to body. Like so:
To make the eyes cut a circle of felt slightly larger than your buttons and sew behind the button when attaching. I like to put one or two stitches from the eyes to the ears to permanently sculpt the forehead but I'm not sure its absolutely necessary. At this point sew a row of medium stitches right around the neck and gather slightly to add definition between the head and the body.
And that's it! Love your puppy and look forward to stray socks in the future!
(P.S. Don't feel like sewing? Click here to buy them in the Little Black Teapot Shop )
Featured on
Update:
Some lovely people sent me photo's of their versions of this project. View it at Single Sock Dog Update.
Happy crafting!
Monday, 7 June 2010
A Frenzy of Soft Toys No.1
I have no idea why making soft toys fascinates me so. And why I apparently do not like making the same one twice. Part of the thoughts that create these little things definitely involves cartoon thoughts. This is (according to the man) how i live my life and I have to agree when I'm feeling particularly self aware. Cartoons are amazing for distilling the essence of a thing. The details are sometimes blown up to be the main aspect and sometimes details are merged. A quick look at the owls above will convince you- these have no head or legs but even small child knows it to be an owl.
I'm sure some art major student could tell me all about this but for the moment I am content to try to distill until I'm drunk on the results.
This is Sock Pup:
Two super soft socks from my local Help the Aged charity store and a teeny bit of an old work shirt. oh. and some felt for around his black button eyes. I had never heard of sock animals before Craftster but am in love. They're so easy and soft!
Bum shot!
Because this may be my favourite part!
Next is Scrap Cat:
Made for a new born (lets just be honest- her mum!) the kitty skin was first made buy randomly piecing various cotton triangles together then zig zagging over those seams. This turned out way better than I hoped although turning the feet was super difficult and the ears were not really how I pictured them.
Here you can see the face better
Excuse the white background which is crinkled! The sun poked its head out briefly and it was a mad scrabble to catch the light, find a background and source the camera before the British summer reared its rainy head once more! My motto may become "I'm a sewer not an ironner", if ironner is even a word. Which it probably isn't since its been underlined in my text editor. damn. I'm not an ironner or a speller....
I'm sure some art major student could tell me all about this but for the moment I am content to try to distill until I'm drunk on the results.
This is Sock Pup:
Two super soft socks from my local Help the Aged charity store and a teeny bit of an old work shirt. oh. and some felt for around his black button eyes. I had never heard of sock animals before Craftster but am in love. They're so easy and soft!
Bum shot!
Because this may be my favourite part!
Next is Scrap Cat:
Made for a new born (lets just be honest- her mum!) the kitty skin was first made buy randomly piecing various cotton triangles together then zig zagging over those seams. This turned out way better than I hoped although turning the feet was super difficult and the ears were not really how I pictured them.
Here you can see the face better
Excuse the white background which is crinkled! The sun poked its head out briefly and it was a mad scrabble to catch the light, find a background and source the camera before the British summer reared its rainy head once more! My motto may become "I'm a sewer not an ironner", if ironner is even a word. Which it probably isn't since its been underlined in my text editor. damn. I'm not an ironner or a speller....
Subscribe to:
Posts (Atom)


